After searching the internet for hours and attempting to setup my production server only to corrupt /etc/passwd and needing to start over, I have decided to document what I do in case I need to do it all again. From my findings, I see a ton of blog posts telling how to do one thing I need, and most are either way out dated or don’t consider modern day security practices. Here’s my take.
Goal: Release my NodeJS app onto the internet (for as little money as possible)
The only paid services I’ll be using is Digital Ocean and Namecheap. I could host using Heroku, and use a MongoDB service, and some logging service, and some whatever service for whatever else. But then I’d be spending $100/mo on all those $5-10/mo services just to have a production ready app. For this app, I’ll be going with a single Digitial Ocean droplet for $0.007/hr aka $5/mo and pay ~$11.00 for my a year of my domain.
Technology:
- Namecheap for domain registration
- With Comodo PositiveSSL for the SSL certificate, or just go with the free Let’s Encrypt certificate
- Digital Ocean for VPS hosting running Ubuntu 14.04
- JustHost for email
- NodeJS for the web application
- NGINX for the web server as a reverse proxy
- MongoDB for the database
- PM2 for the node process manager
Table of Contents
- Buy a Domain Name
- Get NodeJS Hosting
- Connect Your Domain to Your Droplet and Setup IPv6
- Setup Email
- Setup Your Name Servers
- Create a New User and Disable Root
- Update Your System
- Update Node and NPM
- Install MongoDB
- Install the SSL Certificate onto Your Server
- Create a Test App
- Install NGINX with SSL
- Test Your Nginx Configuration
- Create The User to Run Your App
- Install Git
- Install PM2
- Test Your PM2 Setup
- Setup PM2 Log Rotation
- Setup PM2 Deployment
- Finalize the PM2 Startup Configuration
- Considerations if Staying at 512MB
- Checkup on Your Security
- Back to Being a Developer
Buy a Domain Name
First things first: buy a domain name. I went with Namecheap for this app, but it’s a domain name, so go with the cheapest option you can. Can’t think of a clever name? Me neither, sometimes it’s the hardest part of all this. For the purpose of this guide I will be using example.com.
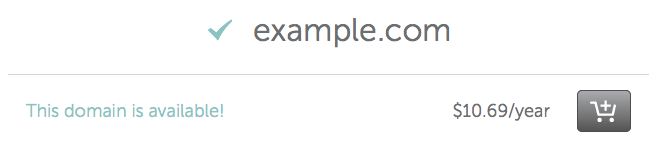
Looks like it’s available. I’ll just register it real quick.
Add it to your cart. Checkout. Search Google for promo codes. Pay. Next, setup Namecheap’s Two Factor Authentication (2FA) right now. Don’t wait, do it now.
Get NodeJS Hosting
I’ll be using Digital Ocean. If you don’t want to use Digital Ocean, then this is the end of the guide for you. I’m going with DO because it’s cheap, it’s pretty, scales very well both in cost and performance, and I don’t go with fad hosting just because someone said so. Google around make the best choice for the time you are reading this.
Make an account and create a droplet. I chose to use the ‘One-click Apps’ to install node, because that’s the easiest method for node. This will be on Ubuntu 14.04.
 Since we are just setting up right now, I went with a $0.007/hr droplet since it’ll take a few hours and we can always increase the specs later. Choose a data center near you. I’m using San Francisco 1. Generally it should be placed near your customers, but DO is so fast it won’t matter right now. Select IPv6 since you live in the 21st+ century.
Never have a server with root capable of logging in. We will first use a SSH Key to login as root, create a new user, then remove the ability for root to login through SSH. GitHub recommends you don’t recreate a new key if you already have one, that would break a lot of things you may have used SSH authentication.
Add a SSH Key, click the ‘New SSH Key’ button and follow the instructions there. The current How To link points here.
Once that’s done, create the droplet. Last, setup 2FA for Digital Ocean.
Connect Your Domain to Your Droplet and Setup IPv6
After your droplet has been created and is running, click ‘Add a domain’ from the ‘More’ menu on the droplets page.
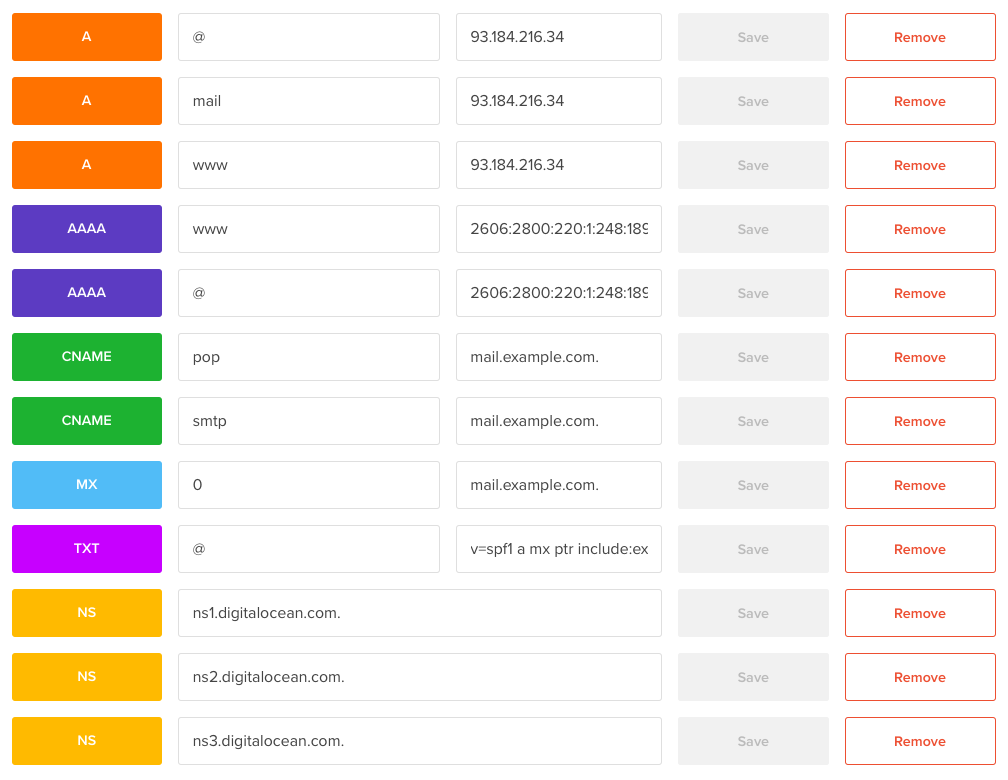
 Type your domain into the ‘domain’ box and make sure your new droplet is selected. This will create a new A record for the IP address assigned to you. (If you decide to create a snapshot and destroy your droplet it will have a new IP when recreated, so you must update the IP.) To have a www subdomain (or any subdomain) you should create a A record with ‘www’ as the name and ‘example.com.’ (Notice the period at the end) as the hostname.
For IPv6 we will need to create an AAAA record. If you go to your droplet, at the top it will show the IPv6 address.

Copy that address, go back to the networking page, then click domains. Select the magnifying glass to view your domain’s DNS. There you’ll add an AAAA record for your host with ‘@’ and for your ‘www’ subdomain. I’ve always done CNAME’s for subdomains, but you can’t replicate records in A and CNAME, this Stack Overflow explains all about that. My mail exchange does not support IPv6, but if yours does you will need to do the same as above for your mail server but with a IPv6 address. Because my mail exchange doesn’t support it, I’m technically not fully IPv6 compatible, but that’s O.K. since basically all IP Clients (browsers/mail/etc) should fall back to IPv4.
My final setup with email looks like this:
Setup Email
As far as the email setup goes, I already had email through JustHost for my personal website. I registered my ‘example.com’ domain with my JustHost account and copied over the DNS records which relate to email. These were the A record for mail, the CNAME records for pop and smtp, the MX 0 record, and the TXT record for spf verification. I’m doing this because I’m already paying for hosting at JustHost which includes email. When that expires, I may move away and chose a different option. I have a few other websites and each have their own emails, so it’s quite cheap for me to do my email this way. All my email is forwarded to my gmail account so I still get the benefit of using gmail. You could also look into managing email yourself, but I really don’t recommend it.
Setup Your Name Servers
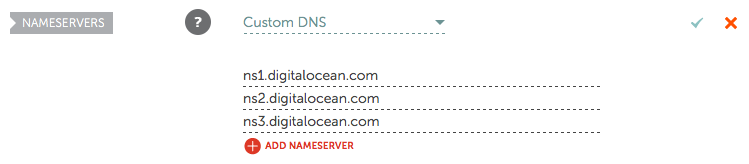
At the bottom of the DNS records you can see three name servers. We will tell Namecheap these are the name servers for our domain. Login to your Namecheap account. Next to your domain, click ‘Manage’. Set the DNS to Custom and enter in the three name servers, then click the green check.
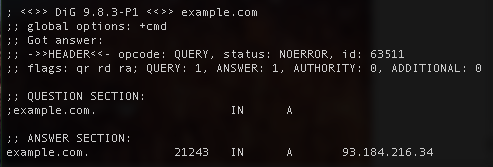
 DNS records usually take 30 minutes to reset. This is set according to your TTL. You can find out your current TTL by doing a
 dig command for your domain. This is the dig for my domain. The TTL is in seconds, so 21243 seconds is like 6 hrs…
Quite a bit so far. As far as progress we’ve got about 1% of the way done. This is what it’s like to be a full stack dev. Well mostly the next part is. At this point you have a domain and hosting. Make sure to ping your domain and verify that it’s running and on the Digital Ocean IP address.
Create a New User and Disable Root
For this we will be mostly following this guide: https://www.digitalocean.com/community/tutorials/initial-server-setup-with-ubuntu-14-04.
SSH into your droplet as your only user: root.
ssh root@example.com
Add a new user. Which will be your primary account, so chose your own username.
adduser example
You will be prompted for a password. Soon we will make it so you won’t use this password to login, but you will need this password to execute commands as root. For all the other info, just leave it blank if you wish.
Add your account to the sudo group so you can execute commands as root:
gpasswd -a example sudo
I’ve seen people use ‘gpasswd’, ‘usermod’, ‘adduser’, and ‘visudo’ commands to add a user to the sudo group. I went with gpasswd.
Copy over the public key we installed on our server for root to now be used for your user:
mkdir -p /home/example/.ssh
cp /root/.ssh/authorized_keys /home/example/.ssh/authorized_keys
Change the permissions of the copied key for your user:
chgrp example -R /home/example/.ssh
chown example -R /home/example/.ssh
chmod 700 /home/example/.ssh
chmod 600 /home/example/.ssh/authorized_keys
This is basically the same as the guide says, but just a different method, all while staying in the server. On your local machine open another terminal and test that you can login using your new user without having to type a password:
# from your local machine
ssh example@example.com
The guide does not mention disabling password authentication, so that whole deal with high security using public keys is useless without also disabling password authentication.
Back on the server, open the sshd config file. I used emacs, but use whatever you’re comfortable with.
emacs /etc/ssh/sshd_config
Find and change these lines from: (they aren’t actually next to each other)
PermitRootLogin yes
#PasswordAuthentication yes
to:
PermitRootLogin no
PasswordAuthentication no
Then restart the SSH service:
service ssh restart
Your SSH key access works because of the default settings in sshd_config ‘RSAAuthentication’ and ‘PubkeyAuthentication’ are set to ‘yes’. To test that you set everything up attempt to ssh from inside your server:
ssh example@example.com
You should see this message:
Permission denied (publickey).
Now try it from your local machine, and you should be able to login just fine. This is because your droplet doesn’t have a SSH key generated to login to itself, only your local machine has that key.
Now logout of your server. This should be the last time you are the root user, and from now on you will use ‘sudo …’ to perform root actions. If you are loving 2FA so far, Digital Ocean has a guide on how to install 2FA for SSH: https://www.digitalocean.com/community/tutorials/how-to-protect-ssh-with-two-factor-authentication. I think all this public key stuff is pretty secure already. I would recommend 2FA for SSH if you aren’t using a SSH key, or if you have a few locations where you have SSH key access.
Login with your new user account and lets continue:
ssh example@example.com
You now have secured your server. From here on we will be setting up our production NodeJS server, finally. You may want to make a snapshot of your current droplet. You won’t have to do all this next time you setup a server. And in case you mess up in the following steps (like I did) you won’t have to start from scratch (like I am now…)
Update Your System
I assume everything is up to date, but just to be sure update and then upgrade the packages. If you want, you can also run autoremove to clean up any unused packages.
sudo apt-get update
sudo apt-get dist-upgrade
sudo apt-get autoremove
Edit: Update Node and NPM
After completing my guide I realized that the default versions of node and npm that Digital Ocean installed were very old versions. This caused the wrong version of my packages to be installed. According to nodejs.com, you can use nodesource.com to get the latest version: https://nodejs.org/en/download/package-manager/#debian-and-ubuntu-based-linux-distributions. Currently it’s at 6.x, so I used:
curl -sL https://deb.nodesource.com/setup_6.x | sudo -E bash -
sudo apt-get install -y nodejs
For npm, you can have it update itself:
sudo npm install -g npm@latest
For some packages you will need build tools:
sudo apt-get install -y build-essential
Install MongoDB
Many guides I’ve read each gave their own way of installing mongodb, then I found out that most of these guides are also telling how to install old versions of the database. I will be instructing you on how to install the latest version and then we will make sure. It’s also important that the version you are running on your dev machine matches up so there aren’t differences when you push your code to the production server. I recommend that you always have the latest version on all your machines.
We will follow the official guide of installing MongoDB on Ubuntu: https://docs.mongodb.com/manual/tutorial/install-mongodb-on-ubuntu/. I won’t be replicating the steps, instead I will only tell you how to verify you are on the latest version.
First they ask you to import the public key. All public keys for Ubuntu packages can be found on the keyserver: keyserver.ubuntu.com. Search for MongoDB and verify that the key is for the latest stable version. The latest version I see is named:
MongoDB 3.2 Release Signing Key <packaging@mongodb.com>
At this time there is a 3.4, but that isn’t the latest stable release. Next, you will create a source list for apt-get to use when searching for MongoDB’s packages. MongoDB’s guide gives a one line command for this. To make sure it’s the correct command you can visit the repo url and find the url they are referencing. Run this command to get your Ubuntu version and code name:
lsb_release -a
Mine shows:
Distributor ID: Ubuntu
Description:    Ubuntu 14.04.4 LTS
Release:        14.04
Codename:       trusty
So I can see that the repo url uses the latest version, 3.2, and the codename trusty. There is an option for stable instead of 3.2, but you should stick with a known version number. Sometimes upgrades aren’t compatible and you wouldn’t want an apt-get upgrade to break your app.
After an install, the service usually starts running. You can verify it with:
sudo service mongod status
From here we will be following a Digital Ocean guide on setting up NodeJS with nginx, along with git and PM2. The guide is here: https://www.digitalocean.com/community/tutorials/how-to-set-up-a-node-js-application-for-production-on-ubuntu-14-04. We’ll skip the sections on node installation since we chose a NodeJS One-Click App when making our droplet. One thing to note is I’ll assume we are using port 3000 for our node app.
Install the SSL Certificate onto Your Server
We will loosely follow these guides: https://www.digitalocean.com/community/tutorials/how-to-install-an-ssl-certificate-from-a-commercial-certificate-authority, and https://www.digitalocean.com/community/tutorials/how-to-create-an-ssl-certificate-on-nginx-for-ubuntu-14-04. Except I will focus on using Nginx and Namecheap.
Login to Namecheap, enter in your 2FA code, select the ‘Manage’ button next to your domain, click ‘Product List’, select your SSL certificate and click ‘Activate’. Since I’m redoing this step I have to click the lock icon next to my domain and click ‘Manage’, then I have to Reissue the certificate. You can reissue your certificate as many times as you like until it expires, the old certificate will be revoked and be invalid.
Now you should see a page like this:
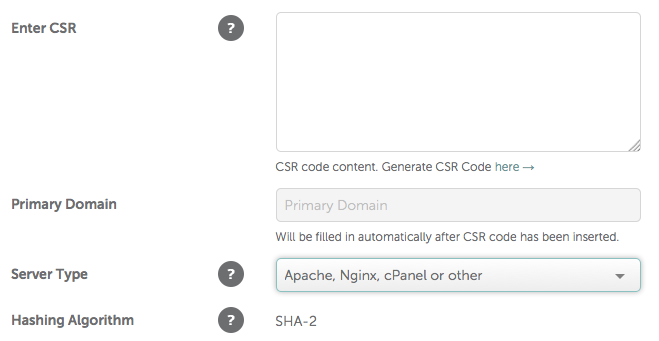
You will now generate a CSR and key file. You should follow the directions provided, but I will give what’s necessary. Do this in your account’s home directory for now. We will move the files to a secure location later. You’ll see I named the generated files with my domain name so I can keep track of them very easily. Also make sure you are using the minimum number of bits for your time period. Comodo requires at least 2048 right now.
cd
openssl req -new -newkey rsa:2048 -nodes -keyout example.com.key -out example.com.csr
Cat out the csr, copy it, and paste it into namecheap.
cat example.com.csr
Make sure to select the option with ‘Nginx’ and click Next. Choose the verification method that’s easiest for you. After verification you will be emailed a zip of your certificate and CA bundle.
Upload the files to your server. You can use sftp by connecting to your server over ssh using your ssh key. I will show how to do this with scp. All with command line. On your local machine open another terminal. I unzipped the file sent from Comodo. Here I’m copying the entire unzipped folder to my remote user’s home directory:
scp -r /Users/me/Downloads/example_com/* example@example.com:~
You can close your local terminal and focus back on the remote machine. For Nginx, we will need to combine the two files provided. Use cat to append the bundle file to the certificate file.
cat example_com.crt example_com.ca-bundle > example.com.chained.crt
We will move the chained certificate and key files once we install Nginx. You may delete the original files (example_com.ca-bundle, example_com.crt, example.com.csr).
Create a Test App
We will first create a “Hello World” app to make sure we are setting up PM2 correctly. Once everything is verified, we will remove this app and install our actual app.
In your home directory, create a new file:
emacs app.js
and paste in this code:
var http = require('http');
var server = http.createServer(function (request, response) {
  response.writeHead(200, {"Content-Type": "text/plain"});
  response.end("Hello World\n");
});
server.listen(3000, '127.0.0.1');
console.log("Server running at http://127.0.0.1:3000/");
When we setup our Nginx configuration we can test it with this simple node site.
Install NGINX with SSL
Install Nginx:
sudo apt-get install nginx
Now we will move the certificate files to a secure location. Make a directory with root privleges:
sudo mkdir /etc/nginx/ssl
A quick ‘ls -l’ confirms we made the directory with root privileges.
ls -l /etc/nginx
![]() Now move the certificate and key files to that folder:
Now move the certificate and key files to that folder:
sudo mv example.com.chained.crt /etc/nginx/ssl/
sudo mv example.com.key /etc/nginx/ssl/
Change the files ownership and permissions to root:
sudo chown root -R /etc/nginx/ssl
sudo chgrp root -R /etc/nginx/ssl
sudo chmod 640 /etc/nginx/ssl/
Now we write the configuration file. Most guides will tell you to modify the default site configuration file. I think this is bad practice, because it doesn’t scale. Most likely you will only have one configuration for this server, but I always expect to have multiple configurations for a web server. You may want a dev site configuration or host some other setup.
Go to Nginx’s configuration files:
cd /etc/nginx/
Remove the symlink for the default site configuration in the enabled sites:
sudo rm sites-enabled/default
Create a new configuration file in site-available for your website:
sudo emacs site-available/example.com
Paste in this configuration file, changing ‘example.com’ to your domain:
server {
    listen 80 default_server;
    listen [::]:80 default_server;

    server_name example.com;

    return 301 https://www.example.com$request_uri;
}

server {
    listen 443 ssl;
    listen [::]:443 ssl;

    server_name example.com;

    ssl_certificate /etc/nginx/ssl/example.com.chained.crt;
    ssl_certificate_key /etc/nginx/ssl/example.com.key;

    ssl_protocols TLSv1 TLSv1.1 TLSv1.2;

    ssl_session_cache shared:SSL:20m;
    ssl_session_timeout 60m;

    ssl_prefer_server_ciphers on;
    ssl_ciphers ECDH+AESGCM:ECDH+AES256:ECDH+AES128:DH+3DES:!ADH:!AECDH:!MD5;
    ssl_dhparam /etc/ssl/certs/dhparam.pem;

    return 301 https://www.example.com$request_uri;
}

server {
    listen 443 ssl;
    listen [::]:443 ssl;

    server_name www.example.com;

    ssl_certificate /etc/nginx/ssl/example.com.chained.crt;
    ssl_certificate_key /etc/nginx/ssl/example.com.key;

    ssl_protocols TLSv1 TLSv1.1 TLSv1.2;

    ssl_session_cache shared:SSL:20m;
    ssl_session_timeout 60m;

    ssl_prefer_server_ciphers on;
    ssl_ciphers ECDH+AESGCM:ECDH+AES256:ECDH+AES128:DH+3DES:!ADH:!AECDH:!MD5;

    ssl_dhparam /etc/ssl/certs/dhparam.pem;

    location / {
        proxy_pass http://localhost:3000;
        proxy_http_version 1.1;
        proxy_set_header Upgrade $http_upgrade;
        proxy_set_header Connection 'upgrade';
        proxy_set_header Host $host;
        proxy_cache_bypass $http_upgrade;
    }
}
To explain what this is doing, I’ll go from top down, because that’s what nginx will do. At the top we defined a server which will listen for all IPv4 and IPv6 traffic on port 80 . All those requests will be replied with a HTTP 301 redirecting the request to https://www.example.com/[whatever]. Next, we define a server which will listen for all IPv4 and IPv6 traffic on port 443 to the domain ‘example.com’. All of these requests will be redirected with a HTTP 301 to https://www.example.com/[whatever]. Last, we define the server that will proxy our node application. This will only listen for all IPv4 and IPv6 traffic on port 443 going to ‘www.example.com’. You’ll notice that the configuration for both the ssl servers are the same. This is the current secure configuration, which I verified using http://ssllabs.com/. You can read more about each of those on your own. For the location, we process all requests through a proxy. This proxy forwards the request to ‘http://localhost:3000’, which is were our app will be listening.
In the configuration, I specify a dhparam file. On my version of Ubuntu, the default file is at 1024 bits, which is not secure anymore. Use OpenSSL to generate a safer dhparam file:
sudo openssl dhparam -out /etc/ssl/certs/dhparam.pem 4096
Create a symlink for this configuration to site-enabled:
sudo ln -s /etc/nginx/sites-available/example.com /etc/nginx/sites-enabled/example.com
The idea of having a sites-enabled and site-available is to easily disable a configuration without losing the file itself. Nginx will load all sites in sites-enabled, so if you need to disable a configuration just delete the symlink in site-enabled and restart the service.
Restart the Nginx service to enable our configuration:
sudo service nginx restart
Your server will now be listening on ports 80 and 443, then redirecting the requests. If the restart shows [FAIL], then check the logs for any mistakes:
sudo cat /var/log/nginx/error.log
You can also watch the access file as you navigate your website with tail’s follow flag:
sudo tail -f /var/log/nginx/access.log
Test Your Nginx Configuration
Run the test app we made earlier:
cd # make sure in your home directory
node app.js
You should see a console output of “Server running at http://127.0.0.1:3000/”. If you go to your website you should now see “Hello World”. This confirms your Nginx is setup correctly, so quit the node application with Ctrl-C and lets set up your app for production.
Now we have Nginx setup and ready to serve our nodejs app. Next thing we’ll do is setup PM2 to manage our nodejs process. We will be following some elements from this guide: https://www.digitalocean.com/community/tutorials/how-to-use-pm2-to-setup-a-node-js-production-environment-on-an-ubuntu-vps, but mostly these next parts I had to come up with due to the lack of up-to-date guides on this subject.
Create The User to Run Your App
For security purposes we will create a new user which will run the app. This ensures that if the app is compromised, the attacker will only have as much access as our app user. We won’t give any permissions to this user other than running the app. Originally, I had come up with a much more secure method then I’ll be presenting, but there were a couple of issues with PM2 that prevented me. You may name the user whatever you wish, I recommend something that resembles your app like the app name.
Create the user (without a password, no need):
sudo adduser appuser --disabled-password
Copy the authorized keys from your user into the app user so you can ssh in as the app user:
sudo mkdir -p /home/appuser/.ssh
sudo cp /home/example/.ssh/authorized_keys /home/appuser/.ssh/authorized_keys
Change the permissions to your app user.
sudo chgrp appuser -R /home/appuser/.ssh
sudo chown appuser -R /home/appuser/.ssh
sudo chmod 700 /home/appuser/.ssh
sudo chmod 600 /home/appuser/.ssh/authorized_keys
You now have another user, just like your account but without the ability to sudo. Having this separate account also allows us have the option of locking it down more then we could with our normal account. You should be able to ssh into this account from your local machine:
ssh appuser@example.com
Install Git
Back in your account:
sudo apt-get install git
Done, that was nice and easy…. Except we need to do some more SSH key stuff to make everything secure. This is required if you have a private repo and pointless if it’s a public repo. We will follow this guide https://help.github.com/articles/generating-a-new-ssh-key-and-adding-it-to-the-ssh-agent/ and take advantage of this https://github.com/blog/2024-read-only-deploy-keys.
Switch into your app user’s account:
sudo su - appuser
Generate a new key: (Don’t enter using a password, this will prevent us from automating the deployment tasks, and this will be read only access anyway)
ssh-keygen -t rsa -b 4096 -C "your_email_for_github@example.com"
Cat out the key to copy it:
cat .ssh/id_rsa.pub
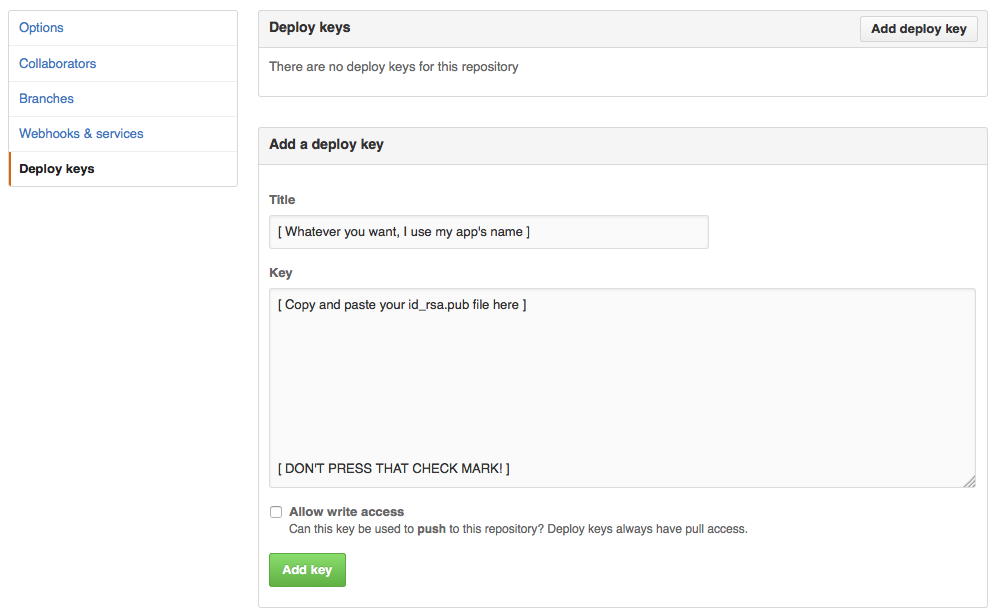
In your repo, click ‘Settings’, ‘Deploy Keys’, ‘Add deploy key’, and aste this key in GitHub.
Now we need to make sure we add github to our known_hosts and verify we setup our keys:
ssh -T git@github.com
Now you can securely pull your repo, which will be necessary for the next steps. While we’re talking about security, have you setup your GitHub 2FA?
Logout of your app user account, which will bring you back to your account:
exit
Install PM2
PM2 will be used as our process manager to persist our nodejs application. Check out their website for a quick start and more about it: pm2.keymetrics.io. It’s just like forever and supervisor, but made for production. You can use PM2 during development as well. Honestly, PM2 was quite difficult to setup the way I wanted. I had to find dozens of docs/tutorials/blogs/etc to figure it all out. It seems that it’s a new product with more and more features being added all the time. While most tutorials will show how to install PM2 and get it running, I will show this and how to use all the modern features: deploy, startup, logging, remote monitoring, etc.
Install PM2 with npm:
sudo npm install pm2 -g
From here we will be performing the PM2 commands within our app user’s account. PM2 was not designed for a multi user system, they are currently working on coming up with the best method to handle multi-user. What this means is each user who runs pm2 basically has their own setup. We want our app user to manage pm2 entirely, so our app user needs to run all those commands. To accomplish this, switch into your app user:
sudo su - appuser
If you want, go ahead and get an account on keymetrics (people who make PM2) so you can remote monitor your app for free. Their paid platform is pretty intense, and their free plan does just what we need. If you do create an account, then link it (they also provide a string to copy paste):
pm2 link [YOUR_SECRET_KEY] [YOUR_PUBLIC_KEY] [MACHINE_NAME]
Then install the monitoring module:
pm2 install pm2-server-monit
and setup PM2 to run on startup with your app’s user:
pm2 startup
This will generate a command for your to run. Exit from your app user to your main account, then copy and paste that command. You needed to exit since the generated command requires root privileges. This will create a startup script for your machine. This script is installed in init.d for Ubuntu, which is where all the startup scripts are placed. It will look at the .pm2 configuration files in your app user’s home directory and start the processes you have saved. Right now we don’t have any processes saved for PM2, we will get to that.
Test Your PM2 Setup
At this point you should be in your home directory of your account. If not, run ‘cd’. Change the owner of the test app you made earlier to the app user:
sudo chown appuser app.js
sudo chgrp appuser app.js
Move the test app to your app users’ home directory:
sudo mv app.js /home/appuser/
Switch into your app user’s account:
sudo su - appuser
Run your test app using pm2:
pm2 start app.js
This will start the app and display pm2’s status. Here’s mine:
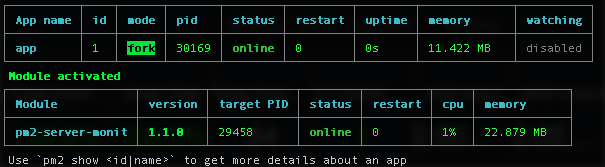
Now your website should display “Hello World”, just as before. If the app crashes, PM2 will restart it. To test that we did the startup script correctly, you can save the running process:
pm2 save
And reboot your machine:
exit # go back to your account
sudo reboot
Want to know when your server has finished rebooting? Ping your domain and when it stops timing out, it’s back online: ping example.com
When your system reboots you should see your website displaying “Hello World” again. You can also see that PM2 was started and that the process is running by checking the status:
sudo su - appuser
pm2 status
We no longer need our test app to run. Delete the app from PM2 and save:
pm2 delete all # You should put the process id when deleting one app
pm2 save
Return back to your account for the next steps:
exit
Setup PM2 Log Rotation
For logs, you can use the native logrotate or their module pm-logrotate. I first was using their module, but found that there were a lot of issues at the time I was working on this. I’ll be using the native logrotate that Ubuntu uses to rotate its logs.
Back on your account, use pm2 to create the logrotate configuration file:
sudo pm2 logrotate -u appuser
This will create the file /etc/logrotate.d/pm2-appuser which should look like this:
/home/appuser/.pm2/pm2.log /home/appuser/.pm2/logs/*.log {
    rotate 12
    weekly
    missingok
    notifempty
    compress
    delaycompress
    create 0640 appuser appuser
}
The generate file won’t work for us. Edit the file:
sudo emacs /etc/logrotate.d/pm2-example
And make it look like this:
/home/<strong>appuser</strong>/.pm2/pm2.log /home/<strong>appuser</strong>/.pm2/logs/*.log {
    <strong>su appuser appuser</strong>
    rotate 12
    weekly
    missingok
    notifempty
    compress
    delaycompress
    create 0640 appuser appuser
}
The only changes I made was setting the location of the logs files within the app user’s account and performing the operation as the app user.
Setup PM2 Deployment
We will use PM2’s deploy to manage the deployment when we make changes in the future. On your local machine, open a new terminal, and cd to the base of your app. The next command will generate a file which we need to commit.
Install pm2 on your local machine:
npm install pm2 -g
Create the ecosystem file:
pm2 ecosystem
Open that file and edit it according to your app. Mine looks like this:
{
  apps : [
    {
      name: "ExampleApp",
      script: "./bin/www",
      env: {
      },
      env_production : {
        NODE_ENV: "production"
      }
    }
  ],

  deploy: {
    production: {
      user: "appuser",
      host: "example.com",
      ref: "origin/master",
      repo: "git@github.com:mozeryansky/example.git",
      path: "/home/appuser",
      "post-deploy" : "npm install && pm2 startOrRestart ecosystem.json --env production"
    }
  }
}
As you can see from this file (or not see…took me a while to decipher each key), when deploying production it will use our app’s user to ssh into our host. Once there it will first cd to path. Next, it will use our git SSH key to pull the latest changes from our repo in the branch specified with ref. Once the pull is complete, it will run the post-deploy command on our server. I setup this command to run npm install so the packages are updated. Then it runs pm2 startOrRestart ecosystem.json –env production, which will either either restart or start pm2 according to the apps configuration in our ecosystem.json file. Our server now has this file we made on our local machine, because we committed it to our repository and it was pulled to the server. When pm2 starts, it will name the app so we can recognize it in pm2 status and the deploy script will basically run pm2 start script. The ecosystem file has one more special feature, and that it will set the environment variables for the script according to the key env_[deploy]. In our case, we will deploy production, so it will load env_production into the environment. Doesn’t matter how you deploy your app, any key in env will be also loaded into the environment.
After you write your ecosystem file, pm2 needs to setup the server by creating a few folders. On your local machine run the setup command:
pm2 deploy production setup
Once that is done, run the deploy command to perform the actions I described above:
pm2 deploy production
Anytime you make and push changes you can use that command to update your production server. I had a couple issues when first running npm install which caused pm2 to fail. For me, I just ran the deploy command again and it worked.
Another thing you should consider for your production machine is the npm dependencies. In some rare cases the versions you have on your local development machine might not be the exact same as the ones that will be pulled from your production server. NPM has a feature called shrinkwrap: https://docs.npmjs.com/cli/shrinkwrap. This will generate a shrinkwrap file, which you will commit. When deploying, the npm install command will read the shrinkwrap file and ensure you are installing exactly the same versions that you deployed. Personally, I won’t be using shrinkwrap, but look into it to judge for yourself.
Finalize the PM2 Startup Configuration
Once we have the site ready we need to save it in PM2. Back on the server in your account, switch to your app user:
sudo su - appuser
Make sure your app appears in the status:
pm2 status
You should see your app in the list, it doesn’t matter if it’s running or errored out. If it’s not in that list, try to deploy again.
Save:
pm2 save
This will save whatever you have currently running in pm2. This ensures that if we restart our server, our startup script will start our app. To test this, exit from your app user:
exit
And reboot your server:
sudo reboot
When it boots back up your node app will already be running.
Considerations if Staying at 512MB
I am adding this section since I discovered that my small droplet couldn’t handle intensive loads. At first I expected this since it’s the smallest droplet, but since part of my goal was “for as little money as possible” I looked into how to make it work.
I installed siege on my local machine, using macports, and have it attacking my server. I have a test page on my server which adds and removes 100’s of records in my mongodb, and siege is directed to call the url to activate that. The result is flood of mongo requests, nginx requests, node requests, the works. At first, the server quickly froze and the only option was to restart from Digital Ocean’s website. After a lot of searching and debugging I’m certain it was a memory issue. The memory filled up, and new processes couldn’t be started. Nginx is a pro, and was fine. But it seemed PM2’s module pm2-server-monit started crashing and respawing until it couldn’t. A few times mongodb crashed and was a real hassle to get started again.
For mongo’s memory issue I noticed that as of 3.2 the default storage engine is WiredTiger. It has a lot of features, and to me, each one looks like a bad idea for a small server. First, the minimum memory it uses for cache is 1G, which is twice our RAM. Next, it uses compression. This is nice if our database gets large, but it requires more CPU which we only have 1 to process everything. On my local machine, I’ve been using the original engine MMAPv1. I switched the engine to that and my memory usage under siege drastically went down.
If you want to change your MongoDB engine, follow these steps:
# stop mongod
sudo service mongod stop

# edit the conf file
# add this line under storage, uncommented 'engine: mmapv1'
sudo emacs /etc/mongod.conf

# IF YOU DON'T CARE IF YOU LOSE YOUR DATA
# delete any databases that were created with WireTiger
# (I don't care since I'm still setting things up)
sudo rm -r /var/lib/mongodb/*

# start mongod
sudo service mongod start

# you may need to restart/deploy pm2 to reconnect to mongo
For the PM2 memory issue, this led me to find this Stack Overflow: http://stackoverflow.com/questions/26193654/node-js-catch-enomem-error-thrown-after-spawn/32444643#32444643.
A swap file is a physical location on your hard drive which your cpu can use as (a slower) RAM. Consider it backup memory, and since we’re on a 512mb droplet it’ll come in handy. From the sources I’ve read, some recommend 2x the current RAM you have, some do not. In my stress tests, I never exceeded 700mb of swap. I’ll go with 2G because it’s the minimum most people recommend.
If you want to add a swap file, follow these steps: (copied from SO, which copied from a DO tutorial)
# Create a 2G swapfile
sudo fallocate -l 2G /swapfile

# Secure the swapfile by restricting access to root
sudo chmod 600 /swapfile

# Mark the file as a swap space
sudo mkswap /swapfile
sudo swapon /swapfile
Last, just to make sure we don’t run into problems with node, let’s restrict the amount of memory our node process can use. I found two methods, one from node and one from PM2. The node method is a flag --max_old_space_size which will abort the process when it exceeds the memory limit, then pm2 would restart it. However, this did not work for me on Ubuntu. The other method from PM2 is a configuration option: max_memory_restart. This does work, but because of how it’s implemented the worker will only check the memory in intervals. The default is every 30 seconds. So you may exceed your limit within the 30 seconds. You can lower the worker interval, but that would increase the cpu usage. I’m going to assume that node may exceed it’s memory usage rarely and I’ll use my swap for worse case scenarios, so I won’t decrease my interval.
If you want PM2 to restart your app when it uses too much memory, follow these steps:
# Open your ecosystem.json file on your local machine
# add 'max_memory_restart: "256M"' within your app declaration
emacs ecosystem.json
My app configuration now looks like this:
{
    name: "ExampleApp",
    script: "./bin/www",
    env: {
    },
    env_production : {
        NODE_ENV: "production"
    },
    max_memory_restart: "256M"
}
Checkup on Your Security
There are a lot of websites that will check your website for common issues. I have found a few and used them to test my setup. Any issues I found, I have already went back and added them into the guide. If you find issues with your setup, comment and I’ll update the guide.
http://ipv6-test.com/validate.php – Verifies your website was setup for IPv6
https://ip6.nl/ – Another IPv6 validator with different information
https://www.sslshopper.com/ssl-checker.html – A fast SSL check
https://www.ssllabs.com/ssltest/ – An extensive SSL server test
http://dnscheck.pingdom.com/ – Checks your DNS servers
http://mxtoolbox.com/ – Checks your MX records, make sure to click ‘Find Problems’. This one finds a few problems that are out of my control like the mail server and some Digital Ocean DNS rules.
Make sure to check your domain ‘example.com’ and all the subdomains like ‘www.example.com’ for tests that don’t automatically do that.
Back to Being a Developer
This concludes the sysadmin stuff. I did destroy my droplet and follow my own instructions to see if it’s all correct. There were a lot of changes over the week that I wrote this. I hope it helps someone else securely setup a server without spending a week searching around.
If your app is like mine, then it’s probably not running for some odd reason. I develop on my MacBook Pro and my production machine is a completely fresh copy of Ubuntu, so I expected a couple hiccups. You may just have a filename case issue or you used a file path local to your machine you forgot to commit.
To help with fixing any potential problems, the log files are located in /home/appuser/.pm2/logs. The log filenames are generally formatted with the app name, the file type, then app id it’s running as. So for me it’s ExampleApp-error-2.log and ExampleApp-out-2.log.
Next, you should consider backup options. I may just go with Digital Ocean’s snapshot backups or eventually roll my own version for free.